Tuesday, September 22, 2015

Dragonoid Character Model

I have done quite a bit of work on my dragonoid character model. Learning how to model the human form is a daunting task. It takes studying anatomy, knowing how to place your edges and vertices in the 3D program you are using to the next level. I used 3D Studio Max to create this character. To start you have to have a good reference. If your reference does not have the right anatomy then your model surely will not. To make a good reference model sheet you must draw using guide lines; top of the head, eyes, ears, body mid-point, end of hands, and at the wrists. These are just a few. Using these will at least give you the correct positioning of each body part in the front, side, and back view. Drawing the back of the character is not always needed; it is used if you have an asymmetrical character. Yet it is useful information while you are modeling. The more information you have the easier it will be to model the character.  
Once here you can start visually laying out your mesh on your character. You will need extra geometry in places like elbows and needs to be able to animate the character correctly. You always have to think about the next step when modeling. How are you going to lay out the UVs? How far will the character be reaching with his arm or legs? Keeping this in mind will keep everyone on the team happy. If you doing it on your own, then it will just save you time in the long run and not have to worry about stretching of the textures or how difficult it is to rig.

After I modeling the character I took it into Zbrush and made a high poly sculpt for baking. This is how I got my results.

Tuesday, August 25, 2015

Samurai Attack

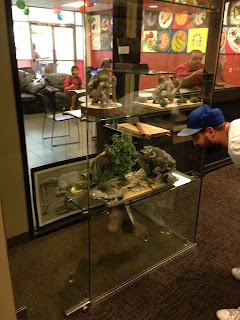
Samurai Attack is a sculpture that I created using two levels of Sculpey. One level is a more colorful, moldable version, the other is less moldable at first, and grey in color; this is level three. I also used pieces of wood for the base, some rocks and faux vegetation for the environment.

To get started, I mixed the level 3 Sculpey with a white level one Sculpey to make the clay a little more malleable. Before I am able to start putting on the clay I need to make armatures and bases for the sculptures to take form with. To make the armature I used thick wire that is all steel and have no aluminum properties. This will make it so the wire does not bend as easily while it is supporting the clay. Once the basic skeleton is made I wrap the current wire with thinner wire, so the clay has something to grab onto and stay. Afterwards I use some epoxy putty to hold the wire to the thicker wire. Now I can start sculpting. I put the clay that I have previously mixed together onto the armature and start blocking out major muscular features and large areas. Then I created the details. For the samurai sculpt, I wanted to bake the Sculpey to finish the model. Baking this type of clay turns it into a hard plastic. Its very useful if you want to paint your sculpture in the future. I was not able to bake the Minotaur since he was too large to fit into my oven.


            I wanted to put both of these characters into one scene together. I created bushes and trees around the samurai. I wanted the character to look as if he was leaping from the bushes to attack the Minotaur.


Tuesday, August 11, 2015

Asteroph's Arrival

Asteroph is an astronaut that crashed onto a planet on his mission to seek a new habitable planet. He discovered himself laying on a table when he awoke from his crash. Fighting aliens, finding out where and why he is in a bazaar spaceship is a big part of the story.
I designed the game as a first person shooter (FPS) to allow for more suspense and fear into the player’s emotions. While playing you come across insect larva, eggs, and hatch-lings themselves. You must defend yourself to continue.  


With Autodesk 3D Studio Max, I created the space ship, enemy and the other assets that I needed to make the game. I used Adobe Photoshop for the textures. I had just learned how to create physical based rendering materials (PBR mats); I used this technique to create the texture for the assets. I used Unreal Engine 4 (UE4) to compile the game together. Within UE4 is a visual scripting application that allows you to create functions, variables, and event scripts much easier, just takes a few tutorials to get some basics done and you can make a simple game without having to touch any code. 

Monday, August 10, 2015

2.5D Side scroller

I designed this to be a 2.5 dimensional game; this genre sometimes is two-dimensional drawings with a ¾ bird’s eye view. In addition, it can be a built with 3D assets along with the same view or another fixed position view. This game is built with 3D assets using a side scrolled 2D view. I used 3D Studio Max to model the assets and 3D Coat to texture them. Unity 4.5 was used as the game engine. I used Java Script and C# for scripting the mechanics and functions.
The simple side scrolled game only has one objective get to the end of the sewer. You have a ma health of 30 yet each monster that attacks you deals 10 damage. To get to the end you will need to defeat or avoid them. Although that is not the only obstacle you have, doors that require keys will be stopping you on their path to the end.  Platforming is a big part of it as well. Power cells are scattered around the level to give your jet pack enough energy for one boost per power cell.

I created this on my own. Going further with this project, I will recreate the assets and texture maps to give them more definition and resolution. I will also create each character to be fully figured. I also plan to use the Unreal Engine 4 game engine.

Tuesday, August 4, 2015

Devolve

In the creation of Devolve I was the Art lead of the project and the overall supervisor. This project was a full packed experience for all the team members that came onto the team. We called ourselves Team Gambit. Building a game takes much effort and planning. And quite a bit of team work. One of my main jobs for our team was planning out the game, witch included asset organization, schedules, goals, maintaining team motivation, tasking each member with assignments, just about anything and everything that was management I took care of it. I also did modeling texturing, C# coding, level layout, and animations. I tried to keep our team motivated by asking them was they wanted to do for the team. I usually kept everyone doing something that they where good at or they wanted to the job. Although, eventually we all had to take tasks that needed to be done rather than just what they wanted to do. Keeping track of everything that was complete and still needed to be completed was a challenge in and of itself. Creating spread sheets and a list for just about everything was called for. Working with this team game me knowledge on how to manage a team correctly and how not to, but in the end we all learn how to be a part of a team.

Designed and modeled by team members, Rigged and Textured by Michael Benton


Monday, July 20, 2015

Prototyping Project

The game is a survival first person shooter and real time strategy type game. We were a team of nine. In this project, I created two different enemy character models, helped concept the enemies, modeled and textured various assets, and helped with the game design of the game. For the enemies I modeled the phase one transformation, and the phase three evolution. The phase one creature is an infected human. The type of parasite that was capable of taking over the human body and controlling it for its own life and destruction.
 I helped concept and design the enemies. A Co. worker finalized the concept of each. There are originally 3 phases of the evolution. I modeled phase one and three using Autodesk 3DS Max and textured them using 3D Coat. After the models where created I took the phase three infected and brought it to Autodesk Maya to start rigging the character using Advanced Skeleton 4. The advanced skeleton program is a rigging tool to set up an advanced rig inside Maya. In addition, it works amazingly for animations. The phase 3 Zombie was a great test of what I could do with a different kind of modeling procedure.